Stripe lets a guest pay a ticket from their own phone by scanning the QR code printed on the receipt. Stripe holds the card details and tells AmigoPOS Cloud when the payment succeeds, so the order settles on its own. The settings are on Back Office › Integrations › Stripe; see Integrations: Stripe, PayPal, Authorize.Net for every field on that page.
Setting this up is a one-time job in three places: your Stripe account, your Stripe account again for the keys, and the Stripe page in Back Office. Allow about fifteen minutes.
Before you start
- A Stripe account that has finished activation and can accept live payments.
- Sign in to Stripe on a computer, not the Stripe mobile app.
- Make sure the Test mode toggle at the top right of the Stripe dashboard is off, so you are working in live mode. Test-mode keys never take real payments, and live and test keys are not interchangeable.
Step 1 — Create the webhook in Stripe
A webhook is the message Stripe sends to AmigoPOS Cloud the moment a guest pays. Without it a payment succeeds at Stripe but the ticket stays open on the POS.
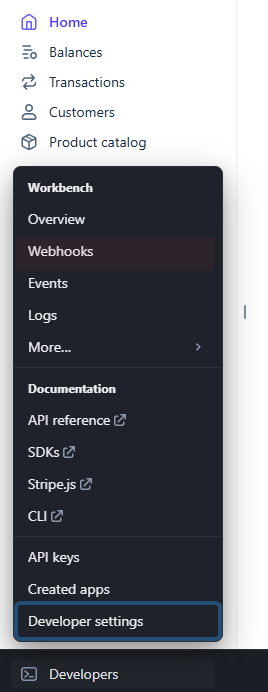
- In the Stripe dashboard click Developers at the bottom left, then Webhooks.
- Click Add destination.
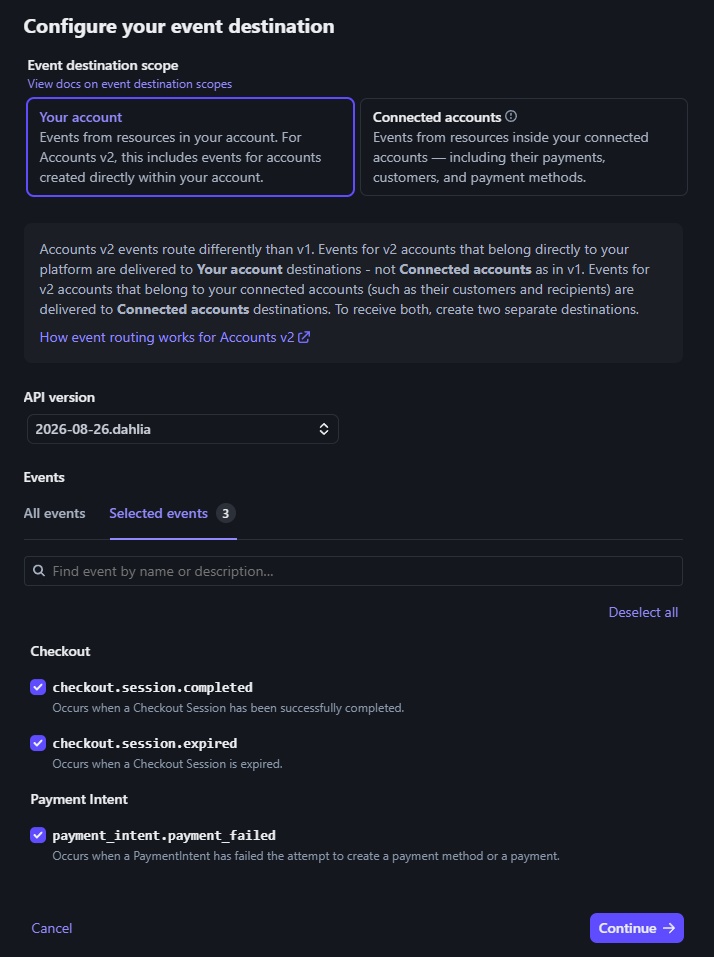
- On the events step leave Your account selected. In the API version list choose the newest version that is not marked as a preview.
- In the event search box, find and tick each of these:
checkout.session.completed,checkout.session.expired,payment_intent.payment_failedandcharge.refunded. If the store also takes Stripe card payments at web checkout, tickpayment_intent.succeededas well. - Open the Selected events tab, confirm they are all listed, then click Continue.
- Choose Webhook endpoint as the destination type and click Continue.
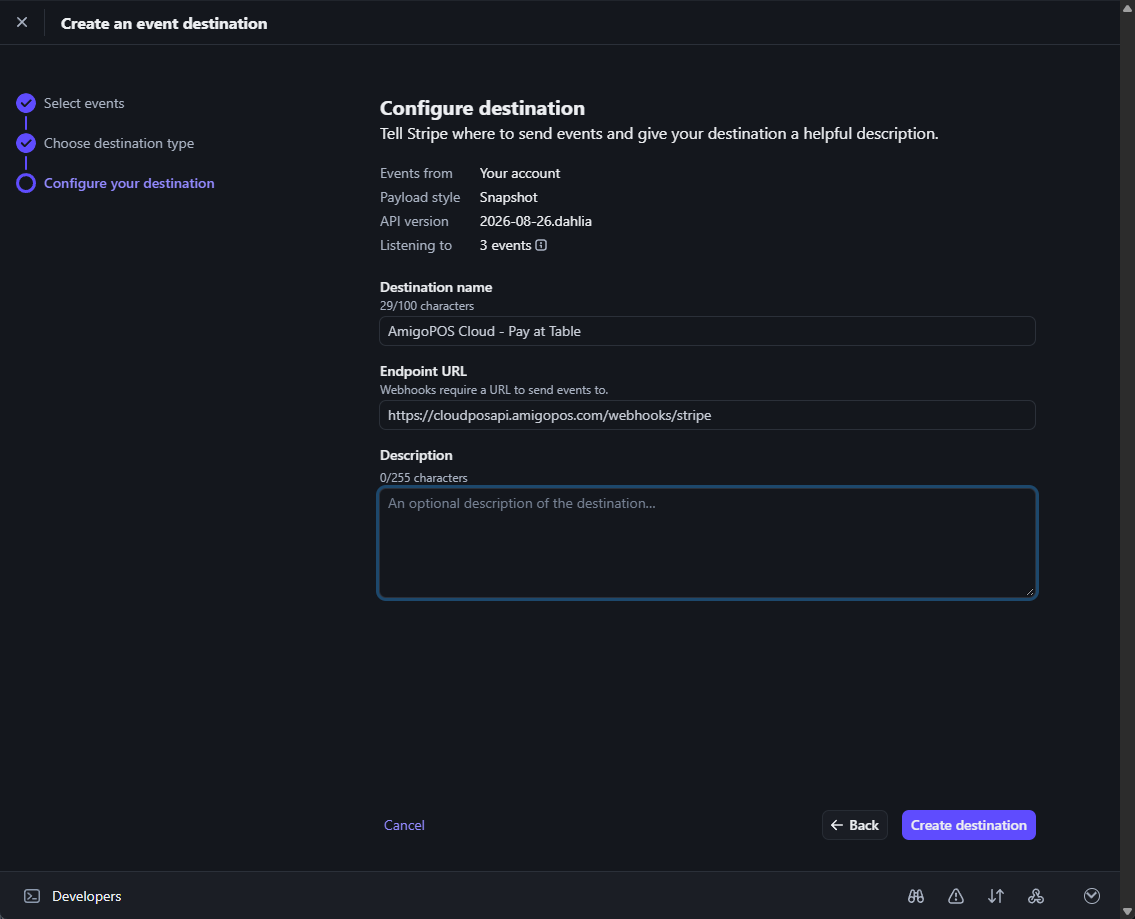
- Give the destination a name you will recognise later, such as AmigoPOS Cloud pay at table. In Endpoint URL enter exactly:
https://cloudposapi.amigopos.com/webhooks/stripe
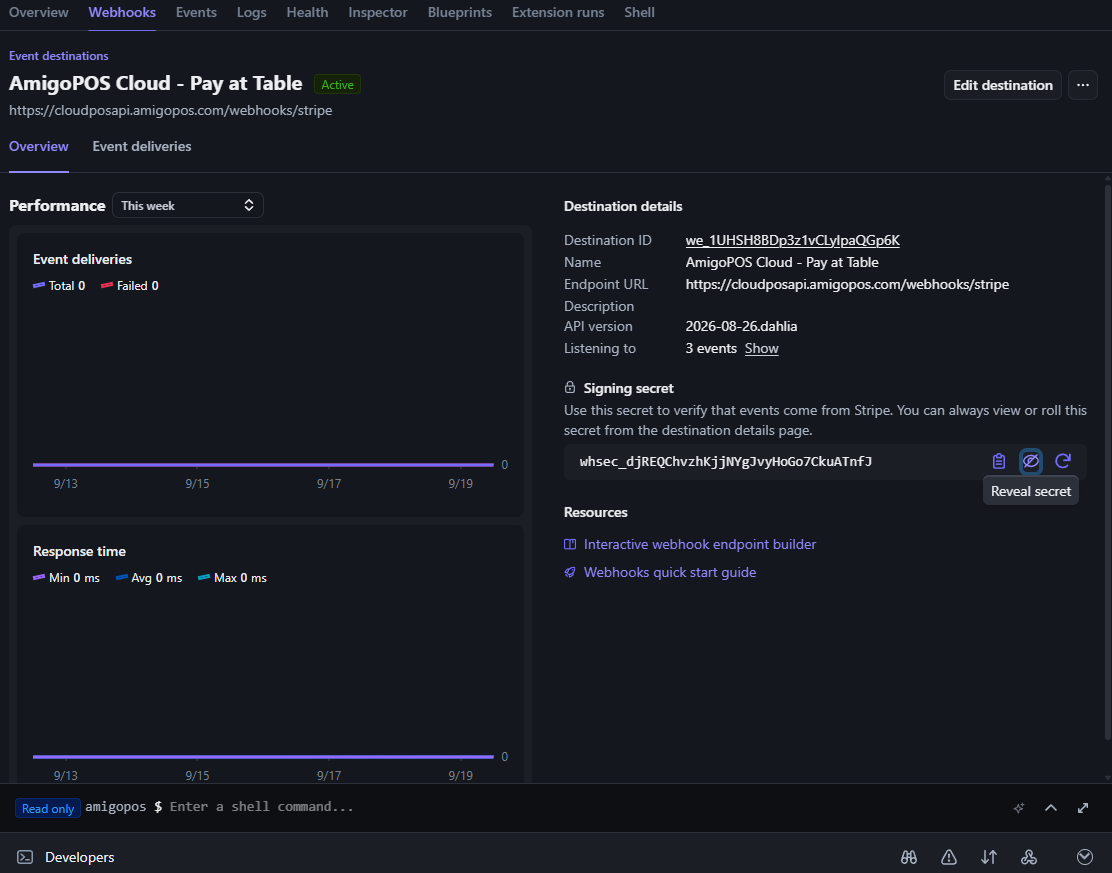
Then click Create destination. - On the destination page click the eye icon beside Signing secret and copy the value. It starts with
whsec_. Keep it for step 3.
Step 2 — Copy your API keys
- Click Developers again, then API keys. Check you are still in live mode.
- Publishable key starts with
pk_live_and is shown in full. Click it to copy. - Secret key starts with
sk_live_and is hidden. Click Reveal live key; Stripe may ask you to sign in again. It is shown only once per reveal, so paste it into Back Office straight away.
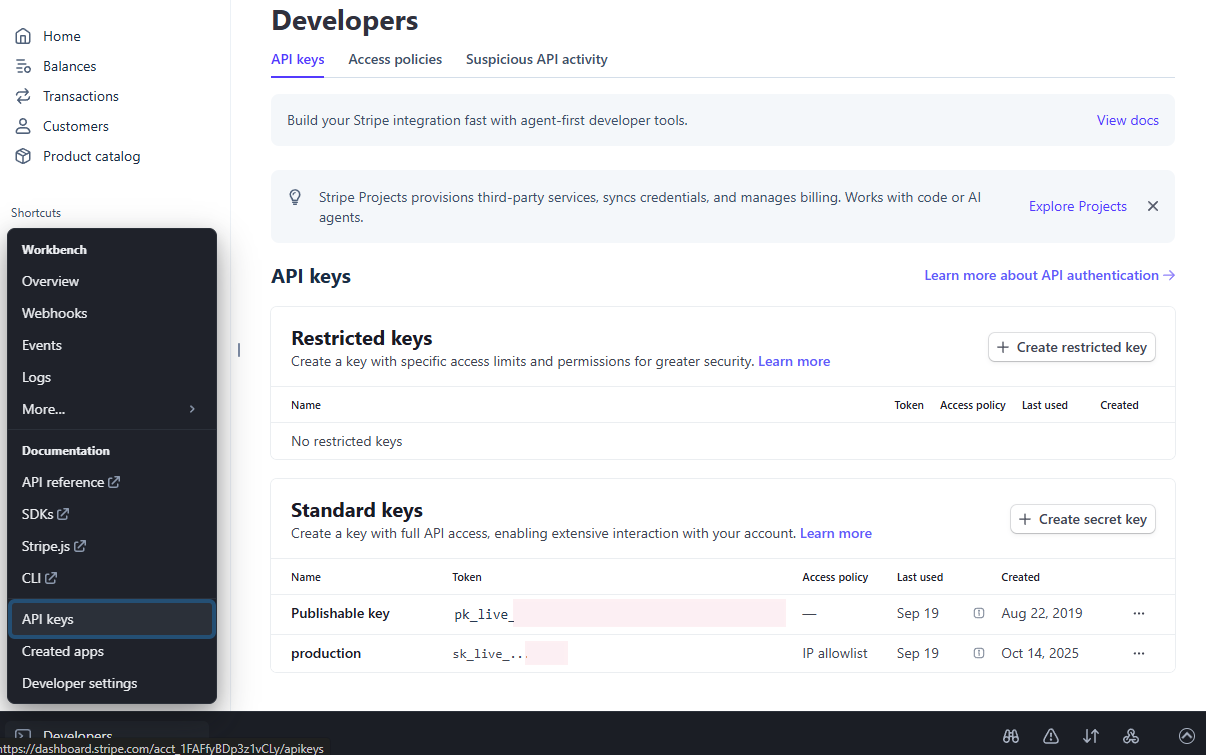
Use the standard secret key. A restricted key from the same page will not work.
Step 3 — Enter the values in Back Office
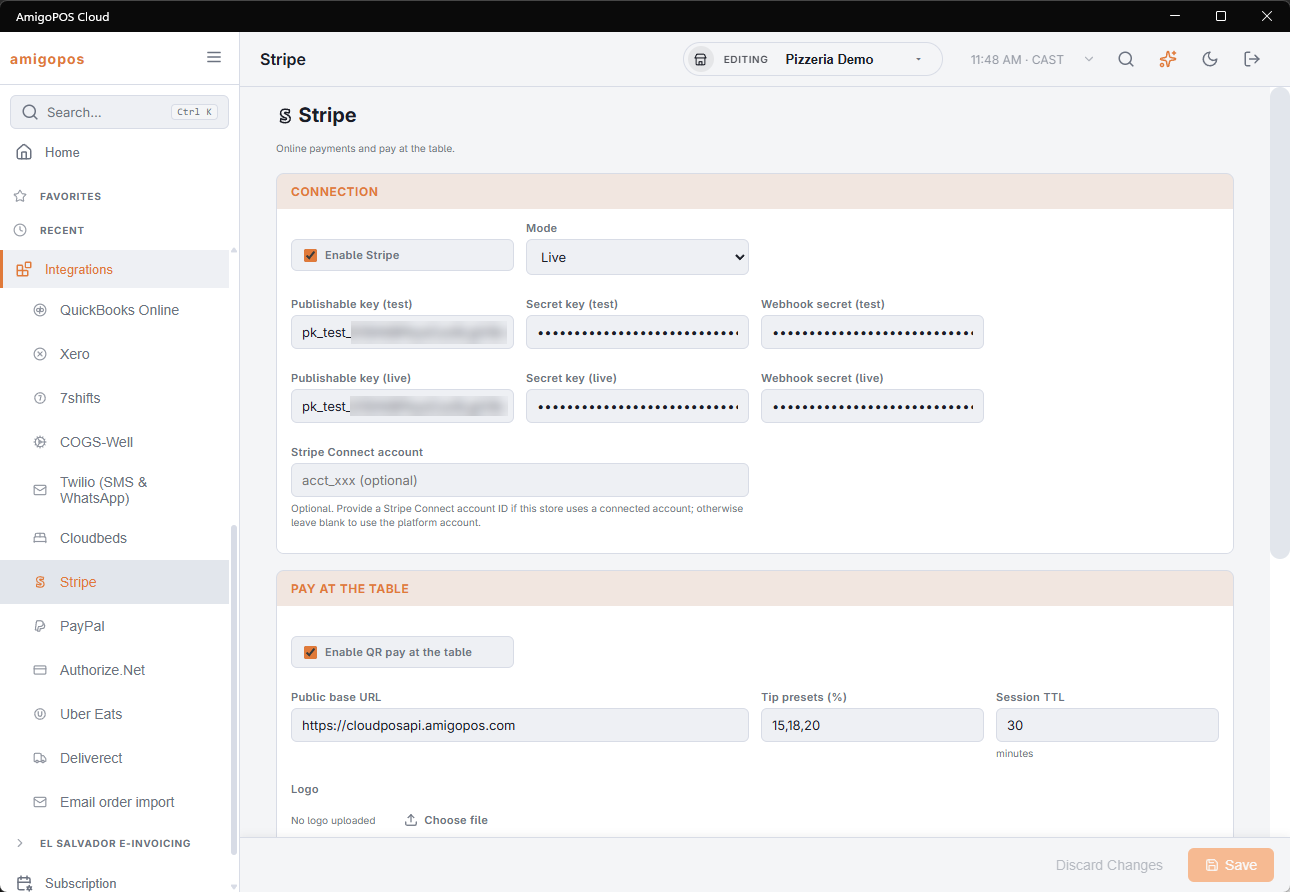
- Open Back Office › Integrations › Stripe.
- Set Mode to Live.
- Paste Publishable key (live), Secret key (live) and Webhook secret (live) — the last one is the
whsec_value from step 1. - Leave Stripe Connect account empty unless your provider has told you otherwise.
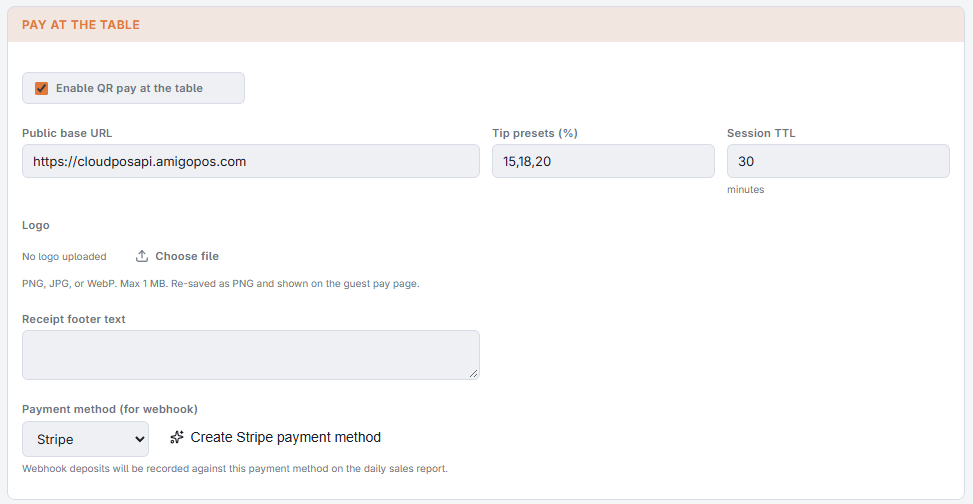
- Under Pay at the table, tick Enable QR pay at the table and set Public base URL to exactly:
https://cloudposapi.amigopos.com
Left blank, the box shows the system’s own address in grey, and that address is used. - Under Payment method (for webhook), choose the card payment method Stripe payments should be recorded against, or press Create Stripe payment method to make one named Stripe (QR Pay). The button is greyed out while a payment method is linked; to make a new one, choose — not set —, save, then press it.
- Click Save.
- Check that the address under Webhook endpoint at the foot of the page is the same one you entered in Stripe in step 1.
These settings belong to the store you are working in. If you run more than one location, repeat step 3 for each one. The webhook in step 1 is created once per Stripe account and covers them all.
Step 4 — Test it
- Ring up a small order at the POS and print the receipt. If the QR code is missing from the receipt, the QR token has not been added to your receipt template — see the receipt template topics.
- Scan the code with a phone that is on mobile data, not on the restaurant Wi-Fi. This proves the address works from outside the building, which is how a guest will reach it.
- Pay the ticket on the phone.
- Back at the POS or in Orders, confirm the order now shows as settled. It normally happens within a few seconds.
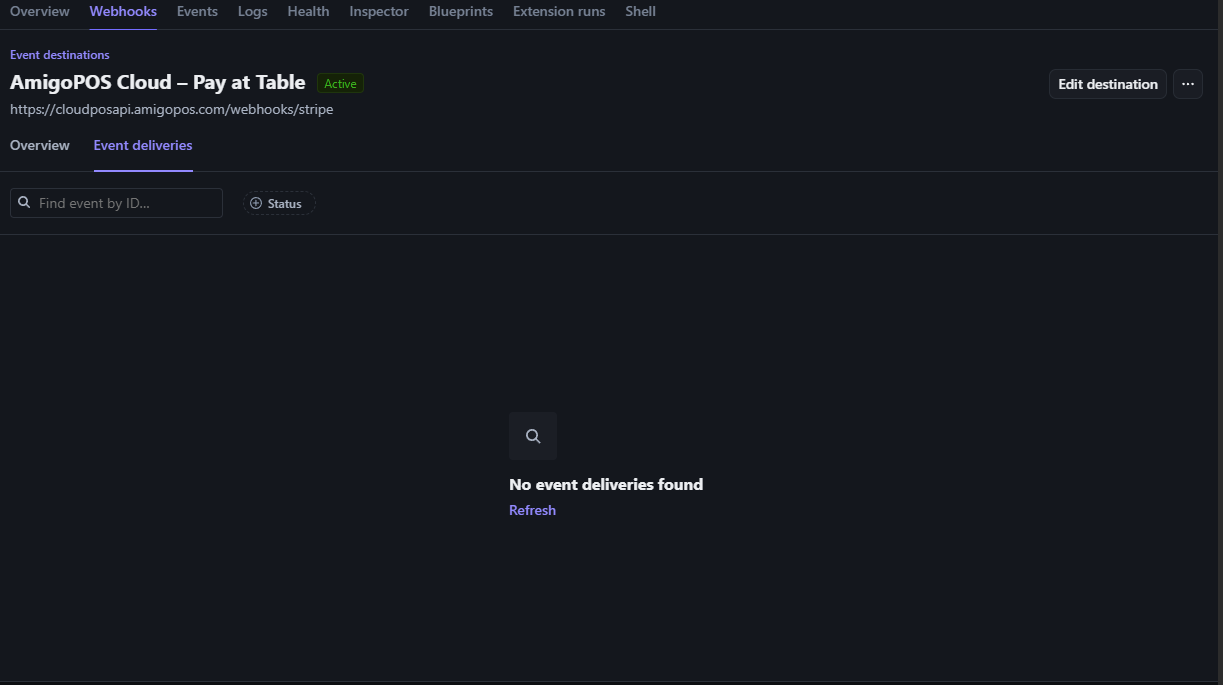
- In Stripe, open the destination you created and click Event deliveries. The payment event should be listed as delivered successfully.
If something does not work
- The guest paid but the ticket is still open. Check that a payment method is chosen under Payment method (for webhook). Then look at Event deliveries on the Stripe destination. A failed delivery points at the endpoint URL or the webhook secret; a successful one means the payment reached AmigoPOS Cloud. Stripe keeps retrying a failed delivery for up to three days, so a ticket can settle by itself once the setting is corrected.
- Every delivery fails. The most common cause is a webhook secret from a different destination, or a test-mode secret entered in the live field. Reveal the signing secret again and paste it fresh.
- The QR code opens a page that says the link is not valid. The public base URL is wrong or was left at a local address. It must be the exact address above.
- Nothing happens when the phone scans the code. Confirm the phone is on mobile data and the receipt is a current one; a pay link expires after the ticket is settled by other means.
Treat the secret key and the webhook secret like passwords. If either is ever exposed, roll it in the Stripe dashboard and paste the new value into Back Office.