This is done once per store, on Meta’s websites, by someone with admin access to the store’s Meta business portfolio, and takes about half an hour. At the end you will have the four values the WhatsApp page asks for: the WhatsApp Business Account ID, a permanent access token, the Phone Number ID and the app’s App Secret. Meta renames and moves its screens from time to time; if a label below differs slightly, look for the nearest match.
1. Business portfolio
Go to business.facebook.com and sign in. Use the store’s existing business portfolio, or create one with the store’s legal name, address and website. The app, the WhatsApp account and the number will all belong to it.
2. Create the app
- Go to developers.facebook.com, sign in with the same Facebook account and choose My Apps › Create App.
- Enter an app name the store will recognise, such as the store’s name followed by “POS messages”, and a contact email.
- Choose the use case Connect with customers through WhatsApp, then Next.
- Select the store’s business portfolio, choose Next, check the summary and choose Create app.
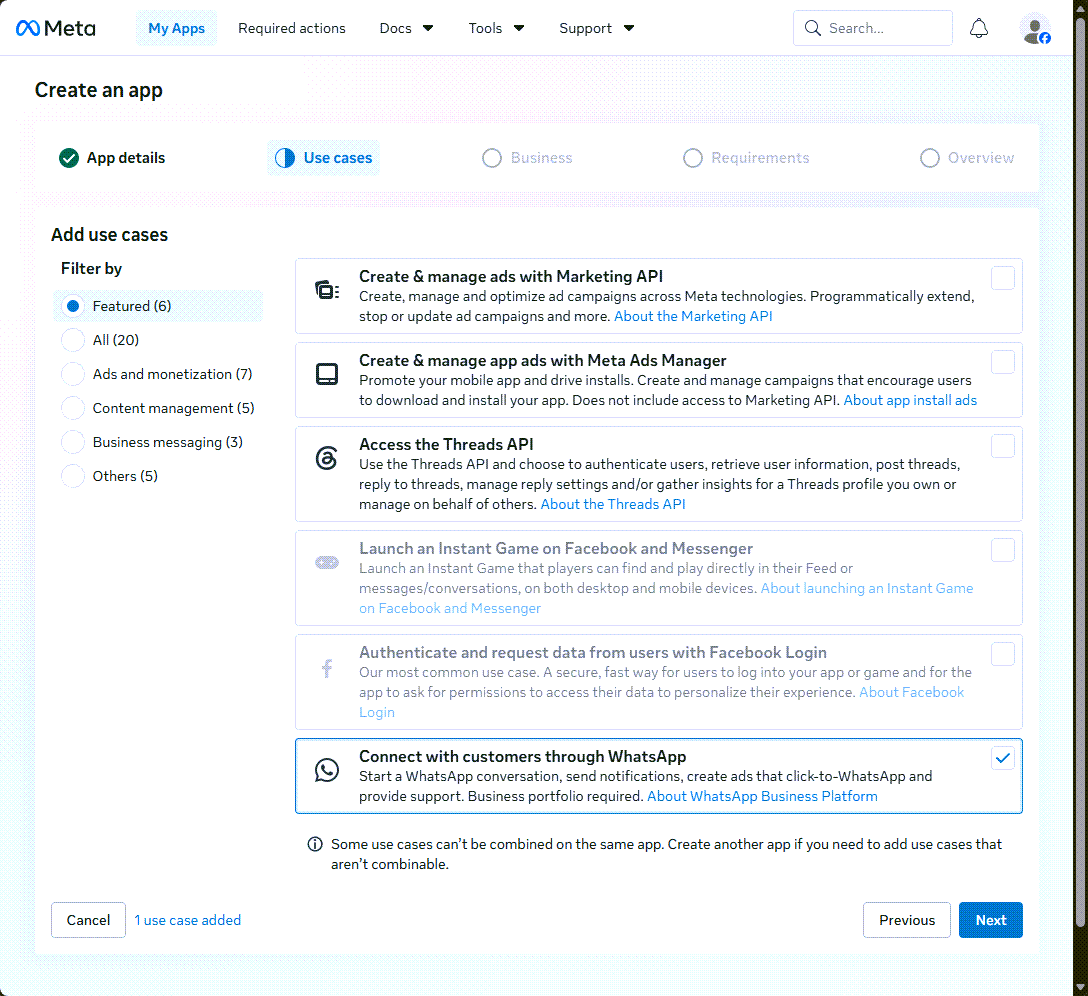
Meta then opens the WhatsApp use case on its Overview page. Keep Integrate with API selected; the setup is the list under Basic setup on the left. To come back to it later, open the app, choose Use cases (the pencil icon) and then Customize on the WhatsApp use case.
3. Add the store’s phone number
- Choose Step 2. Production setup and expand Register your WhatsApp phone number. Leave Configure Webhooks, at the top, for later: it needs two values AmigoPOS shows only once WhatsApp is connected.
- Choose Add new number. The Add phone number window has four pages:
- Business information — the business name, a website or social media page and the country. Pick the store’s business portfolio if asked.
- WA Business Profile — what customers see, including the display name. It must match the business; Meta reviews it.
- Add number — the store’s number.
- Verify number — receive the code by text or phone call and enter it.
Until the business is verified (see the tip at the end), Meta allows two numbers per business.
4. Add a payment method and copy the WhatsApp Business Account ID
- Expand Add payment to send business-initiated messages and follow its Billing Hub link. It opens Billing & payments › Accounts.
- On the WhatsApp Business accounts tab, find the store’s account — not Test WhatsApp Business Account — choose Add payment and add a credit or debit card. Without it Meta does not deliver the messages the store starts.
- The number shown as ID under the account’s name is the WhatsApp Business Account ID: copy it.
5. Generate the permanent access token
- Back on Step 2. Production setup, expand Send message.
- Under Step 1: Generate token, choose Generate token and follow Meta’s prompts.
- Copy the token straight away; Meta may not show it again.
If Meta can’t generate the token, make one by hand, as the link under the box explains: in business.facebook.com › Settings › Users › System users, add a system user with the Admin role; choose Assign assets and give it full control of the app and of the WhatsApp account; then choose Generate token, select the app, set the expiration to Never and tick whatsapp_business_messaging and whatsapp_business_management.
6. Find the Phone Number ID and check the registration
Meta’s setup page shows a Phone Number ID only for its test number, and the store’s number must be registered before it can send. Meta’s Graph API Explorer covers both from the browser:
- On developers.facebook.com, open Tools › Graph API Explorer.
- In Meta App, select the store’s app. Clear the Access Token box and paste the token from step 5.
- Leave GET selected and replace the request path with
WABA-ID/phone_numbers?fields=id,display_phone_number,verified_name,status
putting the WhatsApp Business Account ID from step 4 in place of WABA-ID. Choose Submit. - The answer lists the account’s numbers. For the store’s number (
display_phone_number), copy theid: that is the Phone Number ID. - If its
statusisCONNECTED, the number is registered: go on to step 7.
If the status is anything else, register the number:
- Change GET to POST and replace the path with
PHONE-NUMBER-ID/register?messaging_product=whatsapp&pin=123456
putting the Phone Number ID in place of PHONE-NUMBER-ID and six digits of your choice in place of 123456. - Choose Submit. The answer
"success": truemeans the number is registered; run the GET above again to seeCONNECTED.
If Meta rejects the display name, correct it in WhatsApp Manager › Account tools › Phone numbers and register again once the new name is approved.
7. App Secret, app details and publishing
- In the app, open App settings › Basic (the app’s left bar shows icons; hover over them for their names), choose Show next to App secret — Meta asks for your Facebook password — and copy it.
- On the same page fill in the Privacy Policy URL (the store’s website, or the Privacy Policy page of its online ordering site), User data deletion (a page that tells customers how to ask the store to delete their data; the privacy policy page will do if it says so), the App icon (a square image between 512 × 512 and 1024 × 1024 pixels, such as the store’s logo) and the Category, then choose Save changes.
- Choose Publish in the app’s left bar, or the Publish your app link under Configure Webhooks. Review the requirements and choose Publish; the page lists anything still missing.
Until the app is published, Meta sends only test webhooks, so AmigoPOS would get no delivery updates or customer replies.
What you copied
- WhatsApp Business Account ID — step 4.
- Permanent access token — step 5.
- Phone Number ID — step 6.
- App Secret — step 7.
Configure Webhooks is finished from the next topic, once AmigoPOS shows the Callback URL and Verify token.