Each store keeps its own stock, so nothing moves between stores on its own. Back Office › Inventory › Operations › Transfers moves it as a document you can follow from one end to the other: requested, sent, received.
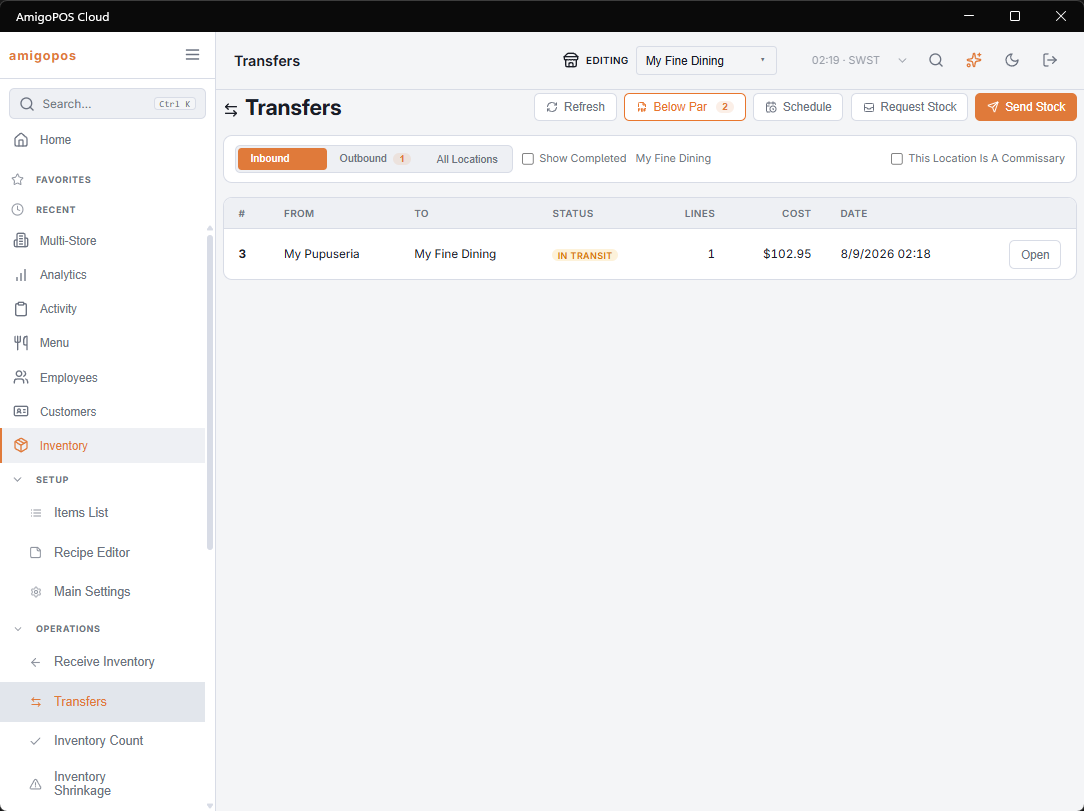
The page
- Inbound and Outbound list the open transfers into and out of the store you are working in, with a count on each. Users with all-store access also get All Locations, the queue for the whole account. Show Completed adds received and cancelled transfers.
- Each row shows the transfer number, From, To, Status (Requested, In Transit, Received or Cancelled), Lines, Cost and the latest date. Open shows the transfer.
- Request Stock and Send Stock start a new transfer. Below Par and Schedule are covered below.
Direct transfers, and a central store
Any store can transfer to any other. An account that runs a central kitchen or warehouse can tick This Location Is A Commissary on that location’s Transfers page (users with all-store access): a store that holds and distributes stock without a register. When you start a transfer, a commissary is selected first. Nothing assumes one exists — store-to-store transfers work the same either way.
The three steps
- Request stock — the receiving store chooses Request Stock, picks From, adds Notes if needed, enters a Qty for each item it needs and chooses Submit Request. Nothing moves yet.
- Send stock — the sending store opens the request, checks each line’s Sent quantity and Our Item (matched by name), and chooses Send Stock. Stock leaves that store at this point, oldest cost first, and shows in its Shrinkage log as a transfer out. A store can also send without a request: Send Stock at the top, pick To, enter the quantities and choose Send Now.
- Receive — the receiving store opens the transfer, enters what arrived in Received, checks Receive As and chooses Receive. It enters as a received lot at the cost it was sent at, with the transfer number as the invoice, and shows in the Received log.
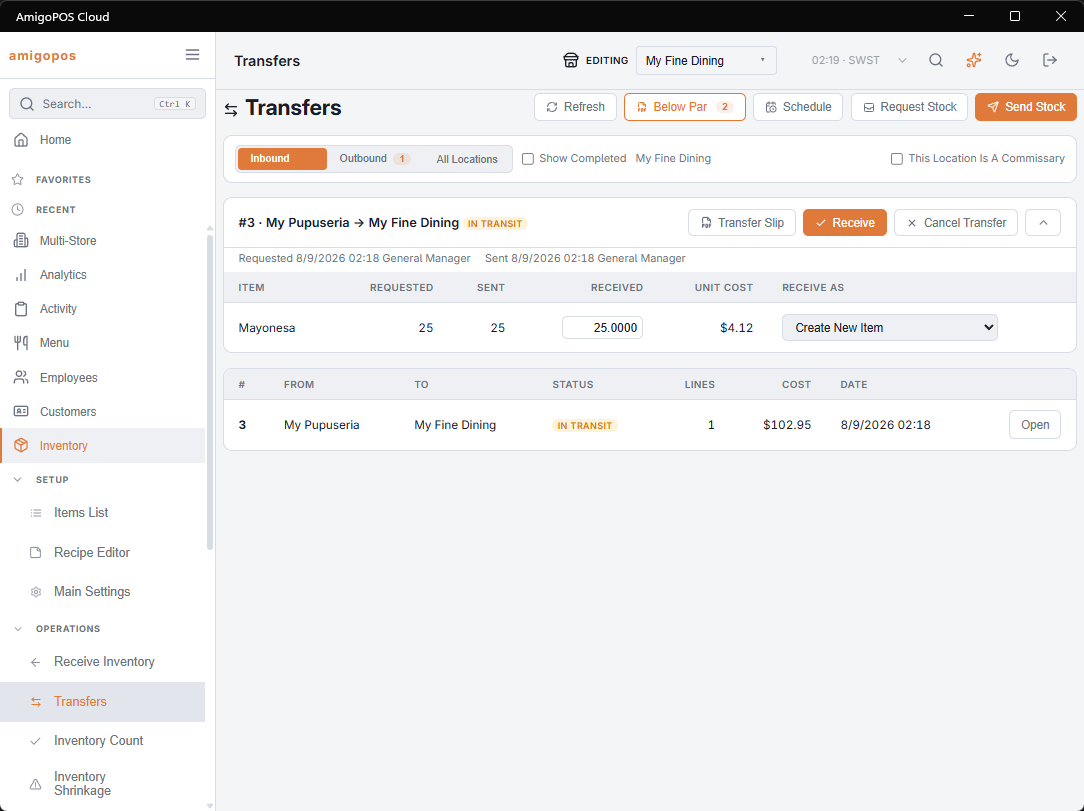
The transfer shows who requested, sent and received it and when, and each line’s Requested, Sent and Received quantity and Unit Cost.
Matching items on arrival
Because each store owns its own item list, arriving lines are matched to the receiving store’s items by name. A line with no match starts on Create New Item, which copies the sending store’s item (name, pack sizes, unit, cost and reorder level) into this store. A line left on — Not Matched —, or with a received quantity of 0, is not received.
Cancelling
Cancel Transfer, then Confirm Cancel. A request cancelled before it is sent moves nothing. Cancelling one that has already been sent returns the stock to the sending store; the returned stock is not listed as a delivery in the Received log.
Par levels and Below Par
Each item’s reorder level and maximum quantity drive the request: the editor shows them as Par beside every item and marks the on-hand figure of items that are short. Fill To Par (N Short) sets each short item that has no quantity yet to what brings it up to its maximum (or its reorder level when no maximum is set). The Below Par button, with a count badge, opens a PDF of everything under its reorder level; Schedule emails that report on a schedule, so the list arrives before the day starts.

Paperwork
A sent or received transfer has a Transfer Slip PDF to travel with the goods. Transfers are also a subject in Ask For A Report, so a question such as what moved between two stores last month is answered there.
Linked items are matched for you
When you send or receive a transfer, each line is matched to an item of your store. An item that is linked to the other store’s item in Store Mapping is picked first, whatever each store calls it. The name is used only when nothing is linked. An item the receiving store creates from a transfer is linked to its source by itself.