Back Office › Integrations › Stripe, PayPal and Authorize.Net hold the store’s accounts with these three payment processors. All three take payments at web checkout; Stripe also runs QR pay at the table. Card terminals at the register are set up separately, on Payment methods.
How the three pages work
- Each page has an on/off switch and a Mode: test (Test on Stripe, Sandbox on PayPal and Authorize.Net) or Live. Each mode has its own keys. The keys of the mode not in use are dimmed but kept, so you can switch back.
- Each page links a payment method. The money taken through the processor is recorded against that payment method on the order and on the sales reports. A Create button makes the payment method and links it in one step. While a payment method is linked, Create is greyed out; to make a new one, choose — not set —, press Save, then press Create.
- Changes are kept with Save at the top of the page; Discard Changes puts back the saved values. The Create button and the Stripe logo take effect at once, without Save.
Stripe
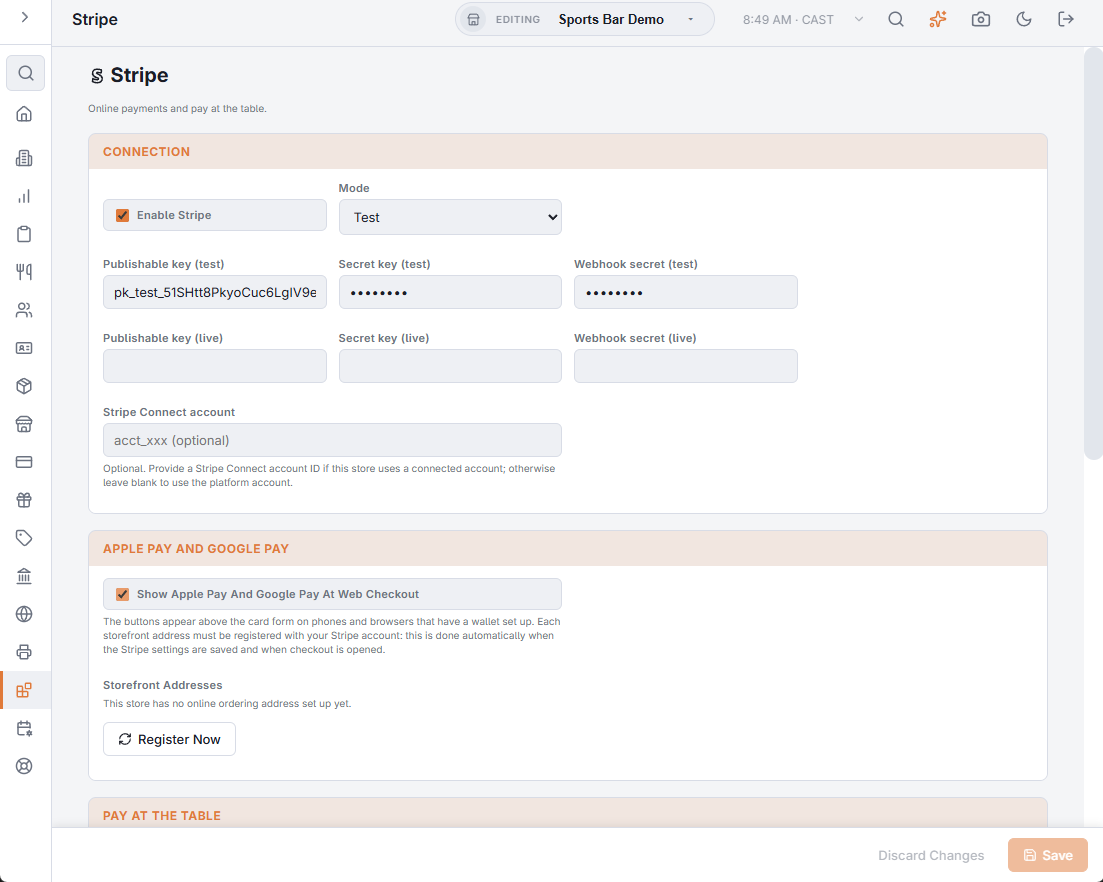
Connection
- Enable Stripe — turns on Stripe card payments at web checkout. QR pay at the table has its own switch, below.
- Mode — Test or Live.
- Publishable key, Secret key and Webhook secret, one row for test and one for live. The keys come from the Stripe dashboard; the webhook secret comes from the webhook you create there. See Stripe setup for pay at the table.
- Stripe Connect account — optional. Leave it blank unless the store uses a Stripe Connect account (acct_…).
Apple Pay And Google Pay
- Show Apple Pay And Google Pay At Web Checkout — on by default. The wallet buttons appear above the card form on phones and browsers that have a wallet set up.
- Storefront Addresses — each address of the store’s online ordering site, with its status for Apple Pay and Google Pay: Active, Not Active or Not Registered. The line under the table shows which Stripe mode was checked.
- Register Now registers the addresses with the store’s Stripe account. It is available once Stripe is on and the page is saved. Registration also happens by itself when the Stripe settings are saved and when checkout is opened.
Pay at the table
- Enable QR pay at the table — prints a pay QR on customer receipts of unpaid orders. See QR pay at table.
- Public base URL — the web address guests reach. Guest links for pay links, bookings and order tracking use it too. Left blank, the system’s own address is used; the empty box shows it in grey. Typing an address overrides it.
- Tip presets (%) — the tip buttons on the guest pay page, separated by commas. The default is 15,18,20.
- Session TTL — how many minutes a guest’s payment session stays open (5 to 240, default 30).
- Logo — Choose file uploads a PNG, JPG or WebP up to 1 MB for the guest pay page; Delete removes it.
- Receipt footer text — a line of text for the guest pay page.
- Payment method (for webhook) — the card payment method that Stripe payments are recorded against. Create Stripe payment method makes one named Stripe (QR Pay) and links it. Until a payment method is linked, Stripe payments cannot be posted to the order.
Webhook endpoint
The address to enter in the Stripe dashboard under Developers › Webhooks, and the events to send. The address is built from the public base URL, or from the system’s own address while that box is blank. If neither exists, it reads (Enter The Base URL Above First).
PayPal
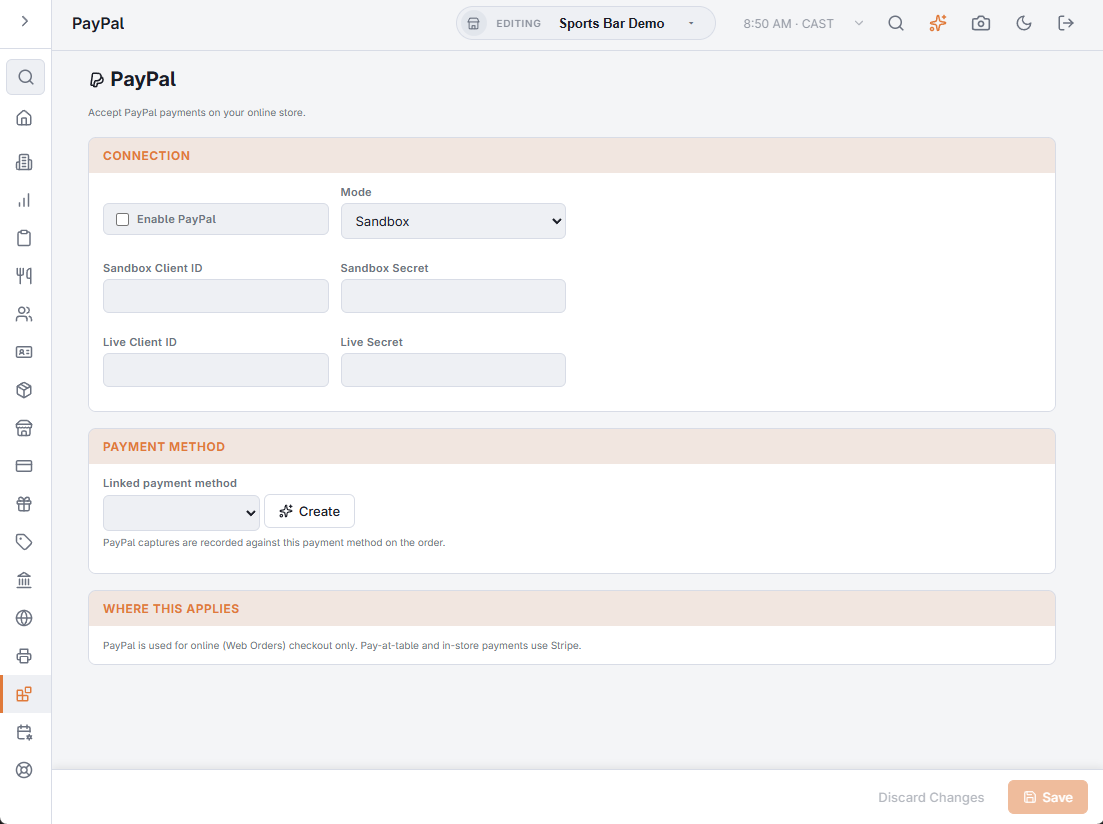
- Enable PayPal and Mode (Sandbox or Live).
- Sandbox Client ID and Sandbox Secret, Live Client ID and Live Secret, from the PayPal developer dashboard.
- Linked payment method — Create makes a payment method named PayPal and links it.
PayPal shows at web checkout when it is on, the client ID for the current mode is filled in and a payment method is linked. It is for web checkout only. PayPal charges in the store’s Base Currency (Back Office › Store Setup › General Settings) when PayPal supports that currency, and in US dollars otherwise.
Authorize.Net
- Enable Authorize.Net and Mode (Sandbox or Live).
- For each mode: API Login ID, Transaction Key and Public Client Key, from the Authorize.Net merchant interface.
- Linked payment method — Create makes a payment method named Authorize.Net and links it.
Authorize.Net card payments show at web checkout when it is on, the API Login ID and Public Client Key for the current mode are filled in and a payment method is linked. It is for web checkout only. The charge is in the currency of the Authorize.Net account.
What the guest is offered at web checkout
There is no separate payments page for the online ordering site. Checkout offers every processor that is switched on above with a payment method linked, plus a pay-at-the-store option when a cash payment method allows it.
- Card — through Stripe or Authorize.Net. The guest pays at checkout and the order reaches the register prepaid.
- PayPal — when the PayPal page is on with a linked payment method.
- Pay at the store or on delivery — offered when a cash payment method on Payment methods is available for tender and its Availability is not Store only. Nothing is paid online; the order settles normally when it is picked up or delivered. It is pre-selected when offered, and a QR table that requires payment never offers it. Offering it alongside online payment brings more orders, at the cost of no-shows on unpaid ones.
How prepaid orders settle
A prepaid web order carries its payment: recalling it at the register shows the balance already covered, and settling closes it against the online transaction — no double charge is possible. Refunds on prepaid web orders run through the normal refund flow and return to the original online payment.
Apple Pay and Google Pay at checkout
When the storefront takes cards through Stripe, checkout can also show an Apple Pay or Google Pay button above the card form, with Or Pay By Card under it. The customer approves the payment in their phone’s wallet instead of typing a card.
- The button only shows on a phone or browser that has a wallet set up — for example Safari with a card in Apple Wallet, or Chrome with a card saved to Google Pay. Everywhere else checkout looks as before.
- It is on by default; Show Apple Pay And Google Pay At Web Checkout in the Stripe section above turns it off.
- The order is placed only when the customer approves in the wallet; closing the wallet sheet places nothing. The order then reaches the register prepaid, like a typed card.
- If the total changed in the meantime (tax rounding, for example), nothing is charged: checkout shows the new total and the customer taps the button again.
- A wallet payment is never kept as a saved card.
- No Apple or Google account is needed: Stripe handles both.
Apple Pay and Google Pay only work on web addresses registered with your Stripe account. The Storefront Addresses table in the Stripe section above shows each address with its status, and Register Now registers them on the spot; registration also happens by itself when the Stripe settings are saved and when checkout is opened.